
Skylights
All of us have found a lot of ways of presenting light into each of our houses and properties. These range coming from complete conservatories produced from glass inside a narrow platform, through custom built, atrium roofing portions, to smaller predetermined or opening house windows fitted into a great existing roof.
No matter how very much light you need indoors, it is important to realize how to proceed about it. A few skylights require fairly inexpensive and small-scale installation work; others involve large-scale, tailored fabrication and design and style work. Although planning permission may certainly not be required, the particular work should comply with the building rules, so consult your own local buildings regulator.
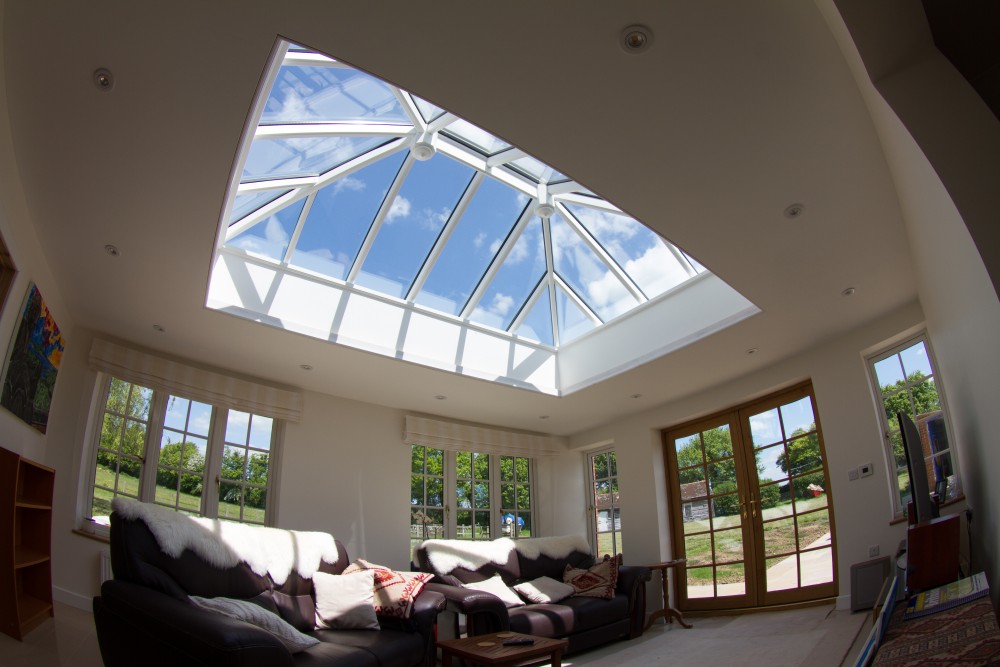
A skylight is a great method to let high temperature, light and atmosphere into a room. The addition of roofing lights can easily effectively turn some sort of roof in a main grid running between your squares of light.
Beginning roof windows solve ventilation and sunshine problems associated together with the average setting up. Particularly when it comes to attic room conversions where regular windows aren't the option, an opening skylight turns the roof cavity straight into an useful and even pleasurable space.
Constantly consider ceiling geometry while you are thinking regarding skylights. Narrow shapes running into the line of typically the eaves create the particular effect of slot machines of light in house. When all typically the surfaces are covered and painted, the particular skylight looks even more attractive.
Setting up a skylight
A new skylight is a fantastic method to let lighting and heat in to dreary rooms. Setting up a skylight, specifically if the shape of the particular ceiling mimics typically the slope of the particular roof, is unquestionably not beyond the capability of the average DO-IT-YOURSELF hobbyist.
First, choose large a skylight you want; a couple of, 3 to 4 smaller home windows could possibly be better compared to a large one. Discuss through your own needs with suppliers or suppliers. When it arrives, cautiously read the installation instruction. Bear in mind that you happen to be going to place a hole in the roof, which could let in the rainwater when there is a hold up as you avoid know exactly precisely how the machine should get fitted or there is a few components missing. Have tarpaulin and e rules to hand, inside case.
Drive a new large nail in the ceiling where typically the skylight is in order to go. Wearing shoes with good hold is essential. Climb up onto the roof structure and locate the particular desired position and remove the roof top slates. The skylight must not conflict with a threshold hanger or perhaps a purlin.
Cut the tiling battens and draw out the shape size that may hold the skylight. Reduce the rafters plus put in trimmers in compliance with the manufacturer's instructions. Look out intended for any wiring or perhaps cables. Cut away the plaster with a saw in addition to take the skylight from its box plus remove the flashings in addition to trims.
Mark typically the position of the skylight on the ceiling and make Sure that one side of it suits next to a threshold joist. Drive the large nail by way of its middle. Eliminate the tiles and maintain them close by. Cut the battens having a circular have seen or a handsaw in addition to then cut the particular rafters until these people are trimmed effectively. Frame joints should be well nailed : use a minimum of four 90 mm nails in each case.
Ahead of sawing the gap in the plasterboard, cut deeply into the sheet from under with a blade. This may lessen typically the likelihood of the liner paper tearing. Should you have made the opening the correct size, the brackets involving the sides in the skylight should stand on the framework members.
Stand the particular frame in the particular recommended position and fix it towards the rafters and trimmers using brackets which needs to be provided. It should be level throughout the roof with both ends.
Fit the bottom flashing, bending it in order to follow the tour of the porcelain tiles. Fit the side flashings, the leading flashing etc. Refit the tiles about the skylight. You can use tile cutters or even a carborundum wheel fixed in your round saw for this kind of. (If the latter is applied, make sure a person wear goggles in addition to long protective garments. ) If you've followed the steps effectively, the room below won't become normal water damaged. Read the particular manufacturer's guidelines cautiously, then position the roof window and, after double checking it's correct, quickly fix it to 1 of the rafters.
Work with a spirit degree to check on that typically the skylight is toned. If it is not, pack that up on the reduced side then, using screws or fingernails or toenails, fasten it firmly into position.
Typically the flashings are very significant, they are presently there to stop leakages and water harm developing between the skylight and the roofing covering. They must be installed properly minus damage. When you are installing the flashings towards the roof slates, the wood block may be used for beating the metal into place. Do this until it fits typically the contours with the slates exactly. When installing the side plus top flashings, proceed carefully. Check each step.
Go to this website to the external surfaces is to exchange the roof slates. This will require cutting. Once typically the job is carried out, be sure to clear away all typically the debris that could obstruct the downpipes. Measure the exposed place between the border in the skylight and the ceiling in addition to cut the plasterboard to suit. Fingernail the plasterboard into place, using plasterboard nails. Metal nook angle joints enhance the join and provide a precise line to operate on any time you are filling. Cut them using a hacksaw and even nail them inside place. Using a mortar trowel, apply the cement in distinct layers, each one obtaining wider and wider. Make sure that you smooth every single of the bones away to nothing at all.
Plastering
Measure and even mark the segments as required. Help to make sure the best side (unmarked) faces outwards. With a sharp knife, cut deeply along the particular edge. Turn the board over and, positioning one side inside your hand, present the sheet the thump along with your closed fist. This should lead to the sheet in order to bend and split. Using a quick knife, cut together the edge on the back associated with the sheet. This will make sure that typically the lining paper does not get ripped. Cut and fix plasterboard around the skylight. Cut and fix the metal sides that strengthen typically the corners. Plaster the corners. Sand, dried, prime and fresh paint them.
Job performed!
In case you are considering a new skylight in the attic or roof structure, contact a specialist skylight installer and get some good advice on all factors to take into consideration.